Intro to Flutter - Part 1
Aleksandr Riabov
Jun 3, 2023
Hello everyone!
In the first part of the tutorial, we will cover the following topics:
- What is Flutter?
- Dart language syntax
- Flutter syntax
- Introduction to widgets
- Stateful vs Stateless Widgets
- Building layout
- Interactivity
- Assets, images
- Navigation and routing
Conceptual Understanding:
What is Flutter?
Flutter is a tool that helps developers create mobile, web, and desktop apps using a single codebase. It's made by Google and uses a programming language called Dart. Flutter comes with lots of pre-made design elements and tools that make it easy to create apps that look great and work smoothly. One of its best features is that it lets developers quickly test and change their app as they work on it.
Dart language syntax:
Variables and Data Types:
In Dart, you can declare variables using the var keyword, which allows the type of the variable to be inferred from the value assigned to it. For example, var age = 25; declares a variable named age with an inferred type of int based on the assigned value of 25.
Dart has several built-in data types, including:
Functions:
A function is a block of reusable code that performs a specific task. In Dart, functions are used to divide your code into smaller, manageable pieces. Here's an example of a basic function in Dart:
void main() {
  printGreeting();
}

void printGreeting() {
  print("Hello, world!");
}
In the above code, we have a function called printGreeting() that simply prints the text "Hello, world!" when called. The void keyword indicates that the function doesn't return any value. The main() function is a special function in Dart and serves as the entry point for your program.
Classes and Objects:
Classes and objects are fundamental concepts in object-oriented programming. They allow you to create reusable structures called objects that encapsulate data and behavior. Dart, like many other modern programming languages, supports object-oriented programming, making it easy to define and work with classes and objects.
class Person {
  String name;
  int age;

  Person(this.name, this.age);

  void introduce() {
    print("My name is $name and I am $age years old.");
  }
}

var person = Person("John", 30);
person.introduce();
Objects have access to their class's properties and methods. You can call a method on an object using the dot notation, like person.introduce();, which invokes the introduce method defined in the Person class.
Lists and Maps:
Example:
var fruits = ["apple", "banana", "orange"];
var person = {"name": "John", "age": 30};

print(fruits[0]);  // Output: apple
print(person["name"]);  // Output: John
Flutter syntax:
For a better understanding of Flutter syntax, let's go through the code below line by line:
import 'package:flutter/material.dart';

void main() => runApp(TicTacToe());

class TicTacToe extends StatelessWidget {
 const TicTacToe({super.key});

 @override
 Widget build(BuildContext context) {
   return MaterialApp(
     title: 'Tic Tac Toe',
     home: Text("Hello World"),
   );
 }
}
First of all we have to import the necessary packages and libraries, for this use import:
import 'package:flutter/material.dart';This line imports the necessary packages and libraries for using Flutter and its material design components. The material.dart package provides the Material Design widgets.
void main() => runApp(TicTacToe());Here, the
class TicTacToe extends StatelessWidget {
 const TicTacToe({super.key});
This code defines a new class called TicTacToe, which extends the
@override
Widget build(BuildContext context) {
  return MaterialApp(
    title: 'Tic Tac Toe',
    home: Text("Hello World"),
  );
}
The
Skill Building:
Widgets:
In Flutter, everything is a widget. A widget can be thought of as a reusable component that helps build the user interface. There are two types of widgets: StatelessWidget and StatefulWidget.
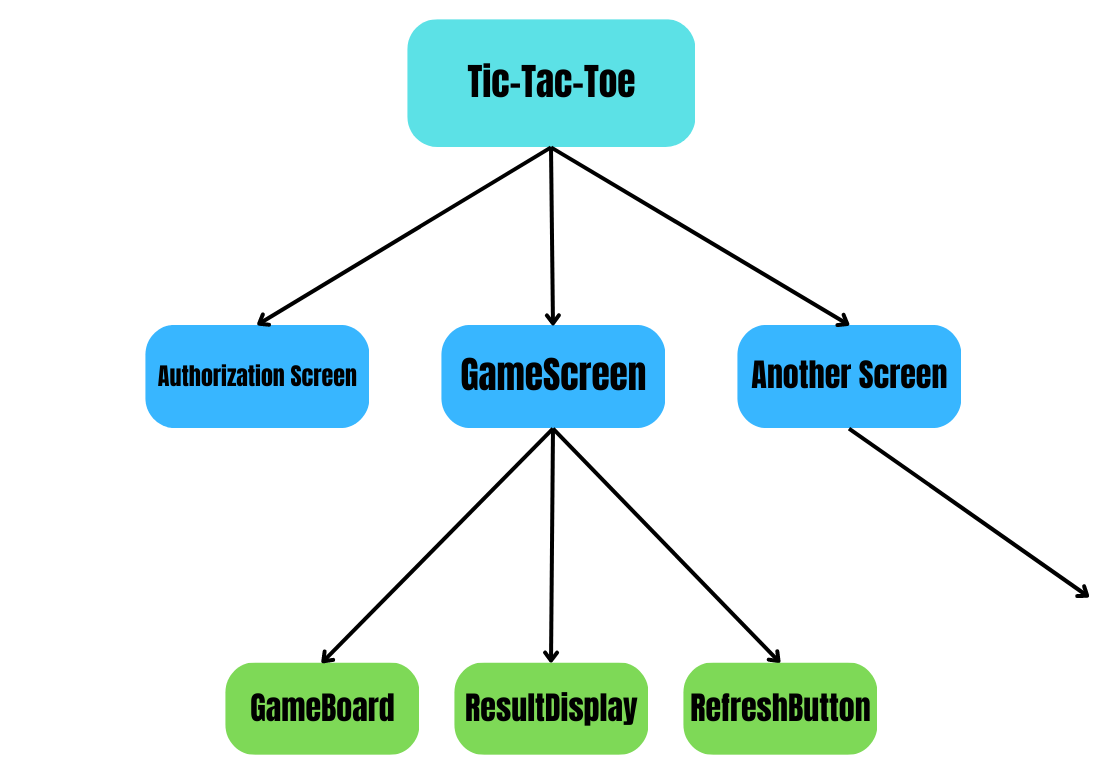
Widget Tree:
Widgets are arranged in a hierarchical tree structure called the widget tree. Each widget can have child widgets, forming a parent-child relationship. The topmost widget is typically MaterialApp or WidgetsApp.
Stateless vs. Stateful Widgets:
StatelessWidget represents widgets that do not change their state once built. They are immutable and can be considered as the building blocks of a Flutter app.
StatefulWidget, on the other hand, represents widgets that can change their state over time. These widgets are mutable and can be updated in response to user interactions or other events.
Introduction to widgets:
Widgets are the UI components that you use to construct your app, such as buttons, text, and images.
import 'package:flutter/material.dart';

void main() {
  runApp(
    MaterialApp(
      home: Scaffold(
        body: Center(
          child: Text('Hello, World!'),
        ),
      ),
    ),
  );
}
In this example, we are using the Text widget to display the text "Hello, World!". We are also using several other built-in widgets, such as MaterialApp, Scaffold, and Center, to set up the app's basic structure.
The MaterialApp, Scaffold and Center set up the app’s basic structure and the Text widget is what displays “Hello, World!” on the screen.
This line import 'package:flutter/material.dart'; imports the Material package from Flutter. This package provides pre-built widgets and components for creating visually appealing and responsive UIs.
The main() function is the entry point for this Flutter app. When the app is launched, the main() function is executed.
Inside the main() function, we have a runApp() method that takes in a single widget as its argument. In this case, the widget being passed in is a MaterialApp widget.
The MaterialApp widget is the root of the Flutter app. It defines the basic material design visual elements, such as the app's primary color, typography, and layout.
Inside the MaterialApp widget, we have a Scaffold widget. The Scaffold widget provides a basic framework for implementing the material design layout structure.
Inside the Scaffold widget, we have a Center widget. The Center widget centers its child widget both horizontally and vertically within the available space.
Inside the Center widget, we have a Text widget. The Text widget displays a string of text on the screen. In this case, the string being displayed is "Hello, World!".
Building layout:
When building a user interface in a mobile or web application, layout refers to the arrangement of UI elements on the screen. In Flutter, there are several built-in layout widgets that you can use to position and size your UI elements.
For example, the Row and Column widgets are used to arrange elements horizontally or vertically, respectively. The Stack widget is used to position elements on top of each other, and the Expanded widget is used to automatically size an element to fill the available space.
void main() {
  runApp(
    MaterialApp(
      home: Scaffold(
        body: Column(
          //Center Column contents vertically
          mainAxisAlignment: MainAxisAlignment.center,
          //Center Column contents horizontally
          crossAxisAlignment: CrossAxisAlignment.center
          children: [
            Text('Hello, World!'),
            SizedBox(height: 16),
            ElevatedButton(
              child: Text('Click me'),
              onPressed: () {
                print('Button clicked!');
              },
            ),
          ],
        ),
      ),
    ),
  );
}
In this example, we're using a Column widget to arrange a Text widget and an ElevatedButton widget vertically. The mainAxisAlignment property is set to MainAxisAlignment.center, which centers the widgets vertically. The SizedBox widget is used to add some space between the Text and RaisedButton widgets. The RaisedButton widget also has an onPressed callback that prints a message to the console when the button is clicked.
Interactivity:
In Flutter, you can make your UI elements interactive by adding event listeners to them. For example, you can add an onPressed callback to a FlatButton or RaisedButton widget to execute some code when the button is clicked.
void main() {
  runApp(
    MaterialApp(
      home: Scaffold(
        body: Center(
          child: TextButton(
            child: Text('Click me'),
            onPressed: () {
              print('Button clicked!');
            },
          ),
        ),
      ),
    ),
  );
}
In this example, we're using a TextButton widget with an onPressed callback that prints a message to the console when the button is clicked.
Assets, images:
In Flutter, you can include assets such as images in your app. To do so, you need to add the asset to your pubspec.yaml file, and then you can use the AssetImage widget to display the image in your UI.
import 'package:flutter/material.dart';

void main() {
  runApp(
    MaterialApp(
      home: Scaffold(
        body: Center(
          child: Image.asset('assets/images/logo.png'),
        ),
      ),
    ),
  );
}
In this example, we're using the Image.asset widget to display an image located at assets/images/logo.png. Note that we added the image to our pubspec.yaml file by including the following:
flutter:
  assets:
    - assets/images/logo.png
Navigation and routing:
Navigation refers to moving between different screens or pages within the app, while routing refers to defining the paths or routes that can be taken to reach those screens.
In Flutter, navigation is typically done using a stack-based navigation system. This means that when a new screen is navigated to, it is placed on top of the previous screen in a stack. When the user presses the back button, the top screen is removed from the stack and the user is taken back to the previous screen.
body: Center(
        child: ElevatedButton(
          child: Text('Go to About Screen'),
          onPressed: () {
            Navigator.pop(
              context,
              MaterialPageRoute(builder: (context) => AboutScreen()),
            );
          },
        ),
      ),
In the second part we will learn how to create our Tic-Tac-Toe app.